Still writing … my daughter just pressed the publish button. (finished now)
In our continuous improvement program we have made three changes to the 105 sq ft Goat Island Skiff (GIS) sails. All new sails will have these features. Order these sails here.
- We were getting enquiries to use the GIS sail on larger and heavier boats. The normal range of sail cloth weights for something like the GIS is between 4 and 5 ounces per yard. The original sails were at 4 oz. We are now cutting them out of 5oz. We don’t expect this to make any change to the performance of the sails on the GIS, but it will help us sell more sails to other boats. It does increase the sail cloth cost slightly.
- We have changed the foot lacing eyelets from #1 to #0. The sail can be laced to the boom or set up loose footed. If loose footed the eyelets now look less obtrusive. They are about half the visual size of the originals. This is a cosmetic change that will just look better when the sail is not laced along the foot. To recap, laced attachment allows a simple ready to use setup and a lighter, more traditional looking boom. Loose footed allows a greater control of sail shape by adjusting the outhaul but requires a stiffer boom. The eyelets along the head remain the original #1. This reduces the sail cost slightly
- The sails are now being supplied with leach ribbon type telltales cut from heat sealed spinnaker cloth. Upwind and reaching they will fly out from the back of the sail when it is correctly trimmed. If the sail is pulled on too tight for the direction you are going they will disappear around the leeward side of the sail. Running downwind with the wind behind the boat the sail will be stalled and they will just act crazy. Cost change is negligible
Using Leach Telltales – or how to see the invisible.
When any boat is reaching or going upwind and the sail is trimmed correctly the air travelling over the sail from the front edge to the back edge is more or less smooth. Front of sail is to the left.
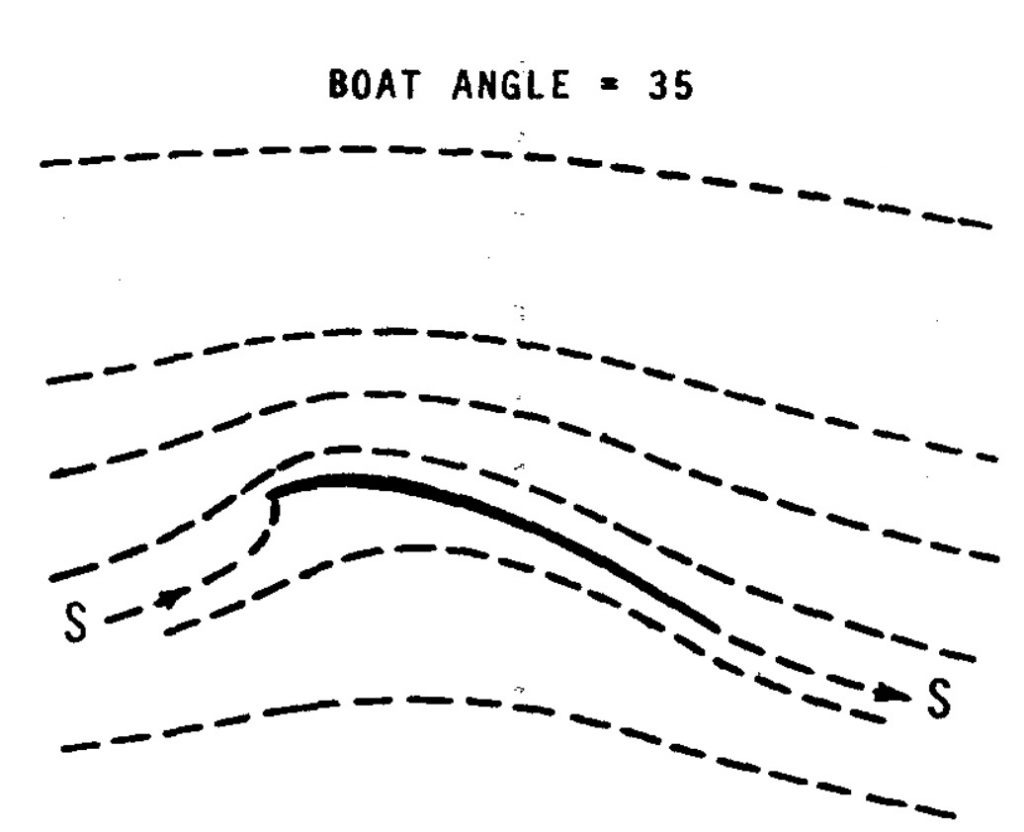
If the sail is pulled in to tight or left unadjusted while steering at a wider angle from the wind then the air on the leeward side cannot stay attached to the sail. The angle of direction change is too great for the wind, so it makes things easy on itself and breaks away. This is called separation.
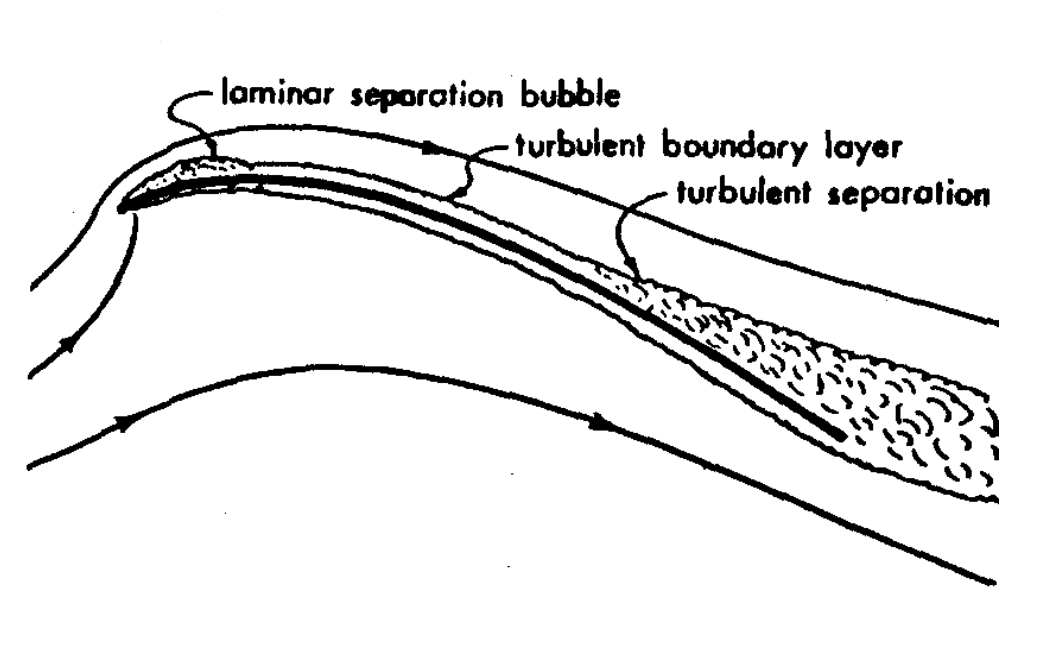
You will see two area of separation on this sail.
A small laminar separation bubble at the leading (front edge) where the air can’t make it around the corner but does have enough energy to reattach a short distance behind the front edge (luff). The air inside the bubble is a confused bunch of turbulent eddies as if someone has stirred water with a spoon.
At the back of the sail is an area of turbulent separation. The size of this area varies with the angle of the sail to the wind. So if the sail is a little bit too tight it might be very small. When very badly adjusted the turbulent separation will move forward until it meets the bubble at the front. At that point the smooth air flow will completely ignore the leeward side of the sail and there will be a big drop in sail force.
This always happens when the wind is from directly behind the boat – the sail doesn’t develop lift from smooth flow, but just provides an obstacle to the wind and steals some of its momentum.
So the logic is that if a sail is pulled in too hard or the boat is at the wrong angle to the wind then a small “turbulent separation” at the back edge will appear.
The leach ribbons or tufts help us see that bubble before the angle gets too wrong and the sail stalls.
Watching this video carefully you can see the turbulent separation area move from the back of the airfoil to the front.
Watching the leach ribbons
Rule 1 – wind is NEVER constant in direction or speed.
Rule 2 – read rule one.
Anything that helps us accurately visualise the wind around the sail will make us sail better and adapt to the moment by moment changes of wind direction is a good thing. It might seem troublesome, but with practice it is easier to learn than steering a car.
Leach ribbons are normally about 12mm wide and 125mm long for our size of sai (1/2 x 5″)l. For bigger boats they might be bigger in proportion to the sail. They can be fixed at about three equal spacings down the back edge of the sail.
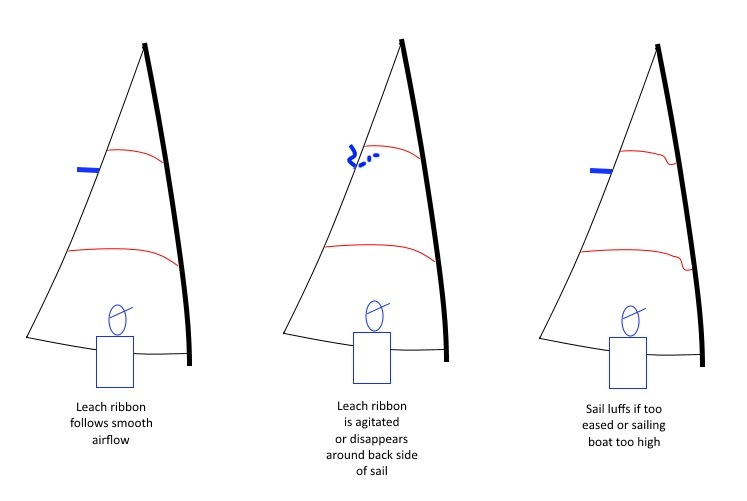
Left picture shows how the ribbon will follow the smooth airflow when the sail is trimmed correctly.
Middle picture shows how the ribbon will disappear behind the sail which the turbulent separation starts. Either ease the sail (best first option) or point at a closer angle to the wind. The sail usually has to be eased quite a lot initially for the ribbon to come out. So a big ease followed by a tighten until the ribbon is flying properly again.
The third picture shows what happens when the sail is too eased. The leach ribbon will fly nicely but you will see the front of the sail start luffing. The correct balance is to have the leach ribbon flying nicely and the luff of the sail just showing a very little bit of luffing sometimes. If the wind is very strong then more luffing is acceptable to reduce the power the sail develops.
So sail too tight or pointing too low – ribbon disappears behind the sail.
Sail too loose or pointing to high – the sail will luff.
With practice our fluctuation between to tight and too loose reduces until we are sailing very smoothly and with maximum efficiency. It becomes automatic like driving a car.
IMPORTANT – Remember with the wind behind the boat and the sail eased the air is no longer flowing from the front to back edge of the sail – it becomes quite random around the whole sail – so the ribbon will not fly. Initially it is correct to ease the sail so the top of the sail is at 90 degrees to the centreline of the boat. If the boat seems lurchy or unstable pull it in to about 80 degrees and get a boom vang or tighten a balance lug downhaul.
Video of separation progressing forward as angle of attack is increased. The top surface of the wing operates in the same way as the leeward side of the sail. Here you can see the turbulent separation area progressing forward. With careful observation of the background you can see the angle of the wing with the ground change. Note the buffeting and shaking that occurs near full separation. There are other sorts of tufts, but leach ribbons work well for all sorts of sails.
The Trim Cycle
Rule 3 – a bit of luffing is better than the leach ribbon disappearing all the time.
To go back to the car analogy. Remember when you drive for the first time. The car lurches to the left, then the right, then left.
Over time, with practice we still make those right to left corrections, but they become tiny so there is the impression of overall smoothness. Same with sail trim. Do it and it becomes an unconscious process.
I tend to focus on one ribbon only for steering purposes.On one side the sail will luff a little. On the other side the leach ribbon will disappear behind the sail. A little luff might reduce sail power a few percent. But a disappearing leach ribbon reduces power by a very large factor.
This assumes you are not overpowered and nor running or broad reaching (the ribbon won’t work at all in that case).
So what to do when the leach ribbon disappears for a period and seems stuck behind the sail? When it is stuck or heavily agitated the separation involves the whole of the leeward side of the sail and the sail is at a very wrong angle.
Obviously, the sail needs serious easing. So you ease it until it luffs just a little bit – ignore the ribbon. When the sail luffs a little bit the ribbon will fly properly again. Then you can switch to the ribbon and pull in the sail a little more until you get the first couple of flicks behind the sail and ease again.
Advanced
The turbulent separation is not completely a bad thing. But it can become very bad quickly and slow the boat down a very large amount.
A small separation will form occasionally when the sail is very perfectly trimmed and there is not too much power heeling the boat excessively. Almost all small boats should not be heeled except in very light winds when any speed is hard to get. Consistent speed and the ideal is to keep the boat flat.
When going upwind a small separation may form occasionally resulting in the ribbon disappears occasionally behind the sail. Maybe for a fraction of a second a few times a minute.
When reaching, particularly if you have adjusted the sail to be deeper (1 in 7 camber rather than the usual 1 in 1o) you can trim the sail so the ribbon disappears behind the sail about 10 percent of the time. If it disappears behind the sail too long the sail has stalled and you have lost a lot of power. So it is a risky edge where a bit more power can be found. Most of us can do it some of the time.
More and the best reference
For more theory and a better explanation read the article “How Sails Really Work” by Arvel Gentry. It is easy to underestimate the fuss that this now well accepted article caused when it was published. I was a nerdy 14 year old and it probably took me a couple of years to really understand it. It was a breakthrough from what had been discussed before and properly explained what happens when two or more sails on a boat interact.
There are still some websites that say that Gentry is wrong, but they are in general having some sort of misconception – for example that fat aircraft wings and sails operate differently in some way. Maybe one day Gentry’s explanation will be superseded but for now we know it is a very largely correct explanation.